Advanced
Learn how to use advanced features in your application.
This section is designed for experienced users who need to manage complex configurations in Nomploy. The Advanced tab is located in your Applications settings. Here, you can execute custom commands, manage cluster replicas, and select Docker registries.
Run Command
- Purpose: Allows users to execute custom shell commands directly within the container.
- Usage: Enter the command you need to run in the provided field and click 'Save' to execute it within the container environment. This tool is particularly useful for debugging or specific administrative tasks.
Cluster Settings
- Purpose: Manages the scaling and distribution of the application across multiple servers or nodes.
- Replicas: Set the number of instances of your application that should be running.
- Registry Selection: Choose the Docker registry from which your container images will be pulled. This is crucial for ensuring that the correct images are used during deployment.
Important Note
Always click 'Redeploy' after modifying the cluster settings to apply the changes.
Build Server
You can configure your application to use an external build server to compile and build your application. This feature allows you to separate the build process from your deployment servers, which is particularly useful when you want to:
- Use powerful build resources without paying for expensive deployment servers
- Keep your deployment servers lightweight
- Build once and deploy to multiple servers
- Isolate the build process from production environments
When you enable a custom build server:
- Build Phase: Nomploy connects to your build server via SSH, clones your repository, and builds the Docker image on the build server
- Push Phase: The built image is pushed to your configured Docker registry
- Deploy Phase: Your deployment server(s) pull the image from the registry and deploy it
Important: Build servers are currently only available for Applications. This feature is not supported for Docker Compose deployments.
Required Configuration: When using a build server, you must configure a Docker registry in your Nomploy settings. The built image needs to be stored in a registry that's accessible to your deployment servers. See Docker Registry for configuration details.
For complete setup instructions, configuration details, and best practices, please read the comprehensive Build Server guide.
Resources
Manage the memory and CPU resources allocated to your applications or databases. These settings help control resource consumption and ensure fair distribution across your containers.
Remember to click Redeploy after modifying the resources to apply the changes.
Memory Resources
Docker API expects memory values in bytes. Nomploy passes the value you enter directly to the Docker API, so you must enter the value in raw bytes. Units like MB or GB are not parsed.
Memory Limit
The maximum amount of memory the container can use. If the container tries to use more memory than this limit, it will be killed by the Docker daemon.
Format: Enter the value in raw bytes, without a unit
Common values:
1073741824bytes = 1GB268435456bytes = 256MB536870912bytes = 512MB
Examples:
268435456→ Limits container to 256 megabytes1073741824→ Limits container to 1 gigabyte2147483648→ Limits container to 2 gigabytes
Values with units are not converted. For example, 1024m is read as 1024 bytes, which is below Docker's minimum (about 6MB), so the deployment fails with a generic error.
Memory Reservation
The minimum amount of memory guaranteed to the container. Docker will try to ensure this amount is always available, but the container can use more if available.
Format: Enter the value in raw bytes, without a unit
Common values:
134217728bytes = 128MB268435456bytes = 256MB536870912bytes = 512MB
Examples:
134217728→ Reserves at least 128 megabytes268435456→ Reserves at least 256 megabytes536870912→ Reserves at least 512 megabytes
Memory Reservation should always be less than or equal to Memory Limit. If you set a reservation higher than the limit, Docker will use the limit value.
CPU Resources
Docker API expects CPU values in nanoCPUs, where 1000000000 nanoCPUs equal 1 CPU core. Nomploy passes the value you enter directly to the Docker API, so you must enter the value in raw nanoCPUs. Decimal core values like 0.5 are not parsed.
CPU Limit
The maximum number of CPU cores the container can use. This is a hard limit enforced by the Docker daemon.
Format: Enter the value in nanoCPUs (1 CPU core = 1000000000)
Common values:
2000000000nanoCPUs = 2 CPUs (2 full cores)1000000000nanoCPUs = 1 CPU (1 full core)500000000nanoCPUs = 0.5 CPU (half a core)
Docker API Value: Internally represented as NanoCPUs
Examples:
1000000000→ Limits to 1 full CPU core2000000000→ Limits to 2 full CPU cores500000000→ Limits to half a CPU core4000000000→ Limits to 4 full CPU cores
Decimal core values are not converted. For example, 1.5 is read as 1 nanoCPU, which is far below Docker's minimum (0.001 CPU), so the deployment fails with a generic error.
CPU Reservation
The minimum number of CPU cores reserved for the container. Docker will try to ensure this amount is always available.
Format: Enter the value in nanoCPUs (1 CPU core = 1000000000)
Common values:
1000000000nanoCPUs = 1 CPU500000000nanoCPUs = 0.5 CPU
Docker API Value: Internally represented as NanoCPUs
Examples:
500000000→ Reserves half a CPU core1000000000→ Reserves 1 full CPU core250000000→ Reserves a quarter CPU core
CPU Reservation should always be less than or equal to CPU Limit. Setting it too high may prevent the container from starting if resources aren't available.
Docker API Reference
When Nomploy communicates with Docker API, these values are sent in the service specification:
{
  "TaskTemplate": {
    "Resources": {
      "Limits": {
        "NanoCPUs": 2000000000,
        "MemoryBytes": 1073741824
      },
      "Reservations": {
        "NanoCPUs": 1000000000,
        "MemoryBytes": 536870912
      }
    }
  }
}
This JSON represents:
- CPU Limit: 2 CPUs (2000000000 nanoCPUs)
- Memory Limit: 1GB (1073741824 bytes)
- CPU Reservation: 1 CPU (1000000000 nanoCPUs)
- Memory Reservation: 512MB (536870912 bytes)
Learn More
For detailed information about Docker API resource specifications and service creation, refer to the official Docker Engine API documentation:
Docker Engine API - Service Create
This documentation includes:
- Complete resource specification schema
- Advanced configuration options
- API request/response examples
- Additional parameters and constraints
Volumes/Mounts
Configure persistent storage for your application to ensure data remains intact across container restarts and deployments.
Bind Mount: Maps a host file or directory to a container file or directory. Typically used for specific configurations or databases.
- Host Path: Path on the host.
- Mount Path: Path in the container.
Volume Mount: Uses Docker-managed volumes that are easier to back up and migrate than bind mounts.
- Volume Name: Name of the Docker-managed volume.
- Mount Path: Path in the container where the volume is mounted.
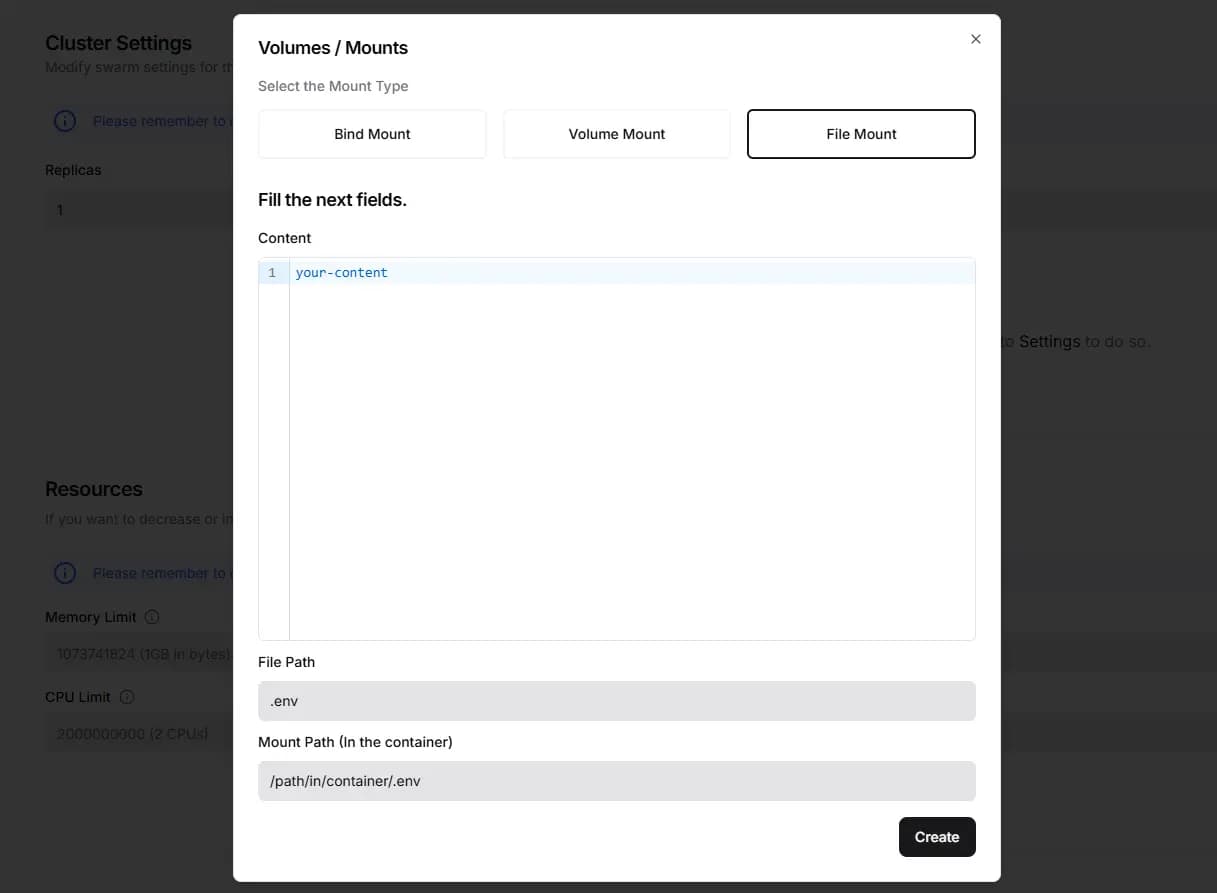
File Mount: Specifically for single files, useful for configuration files.
- Content: The content to store in the file.
- File Path: The name of the file.
- Mount Path: Path in the container where the file is placed. The path must also contain the filename.
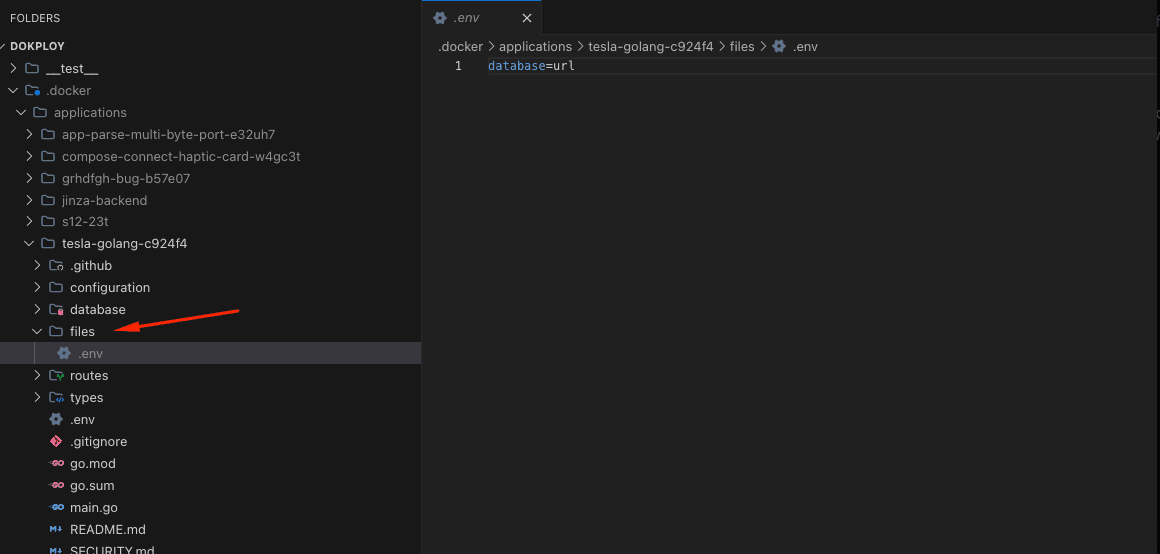
File mounts are a Nomploy feature. When you create a file mount, Nomploy stores the file in a folder called files inside your project directory. This file is created once when you set up the file mount and persists across deployments.
Redirects
Redirect requests to your application to another URL based on specified rules, enhancing navigational efficiency and SEO.
- Regex: Enter a regular expression to match the URLs that need redirecting.
- Replacement: Specify the target URL where traffic should be redirected.
- Permanent: Toggle this option to apply a permanent (HTTP 301) redirection, indicating to browsers and search engines that the page has moved permanently.
Example
To redirect all traffic from "http://localhost" to "http://mydomain", set the Regex as http://localhost/(.*) and the Replacement as http://mydomain/$1.
Security
Add basic authentication to your application to restrict access.
- Username: Enter a username.
- Password: Enter a password.
Important Note
Adding basic authentication will prompt users for a username and password before allowing access to the application. Use this for environments where an additional layer of security is required.
Ports
Expose your application to the internet by configuring network ports, allowing external access.
- Published Port: The port number on the host that will route traffic to your application.
- Target Port: The port number inside the container that the application uses.
- Protocol: Choose between TCP and UDP based on your application's requirements.
Important Note
Ensure that the published port does not conflict with other services on the host to avoid port binding errors, also this port is used mostly for accesing the application from the outside, eg your-ip:port, this is not for accessing the application trought a domain.
Traefik
Provides a dynamic and robust method to manage HTTP traffic to your services, including load balancing and SSL termination.
- Rules: Define complex routing, load balancing, and security configurations using Traefik's powerful rule-based configuration system.